Check out what CodeIgniter is and how to install it.
First of all, for folks who do not know what CodeIgniter is, it is a PHP MVC framework used for the fast development of web programs.
It carries libraries, an easy interface, and a logical structure to access these libraries, plug-ins, helpers, and other resources.
that more easily clear up complex PHP functions while keeping high performance.
CodeIgniter framework is in high demand amongst PHP developers because of its flexible capabilities and benefits.
A web software developed on CodeIgniter works efficaciously and quickly.
It presents an advanced set of elements to write down from scratch to build dynamic web software.
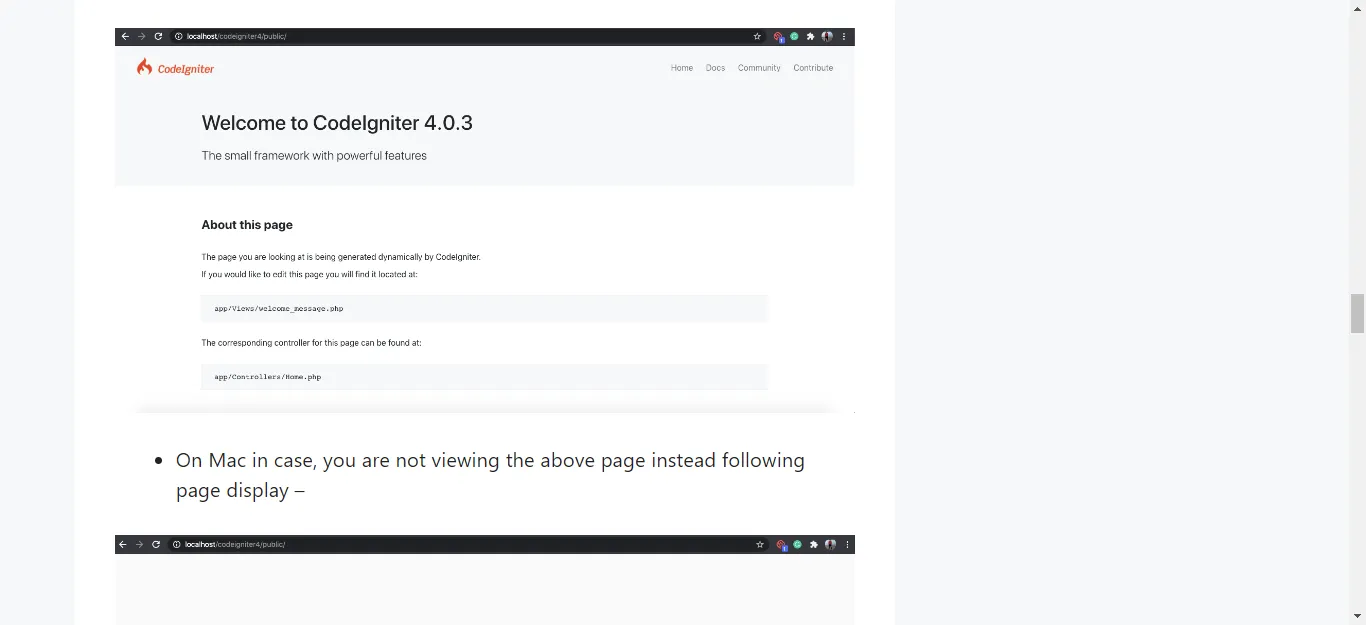
On February 24, CodeIgniter 4 was officially launched. Due to the rapid development of technology, CodeIgniter was forced to make major changes.
Therefore, CodeIgniter 4 is very different from CodeIgniter 2 and CodeIgniter 3. Some of the functionality of CodeIgniter 4 are-
The former version of CodeIgniter was based on PHP 5.6 or less, but CodeIgniter 4 has the functionality and functionality. PHP 7.2 compatibility.
CI 4 also supports command-line programs. According to the latest trends, the maximum frames provide the usability and library of the CLI.
So now it has adopted this functionality as well and now you can use the command line in the latest version of CI.
CI 4 now provides a public folder, intended as the document root for your application.
CI 4 now has a proprietary server like laravel and you can start it using PHP Spark Serve.
The databases supported by CodeIgniter are –MySQL (5.1+), PostgreSQL, and SqLite3.
In CI4, if you want to use CURL Request, you need to install lib curl.
How to install
Method 1: Enable extensions
Open php.ini file to enable intl and mbstring extension.
Search extension in the file.
And install from there.
Method 2: Manual Installation
Manual CodeIgniter 4 installation, the same as installing CodeIgniter 3.
Download the CodeIgniter 4 file at the following link, then extract it on your web server.
Method 3: Using composer
Composer is a Dependency Manager for PHP, as well as NPM in node.js.
To be able to install CodeIgniter 4 using Composer, you must first install Composer on your computer.
If Composer is installed properly, check your PHP version. This is important, if your PHP version is below PHP 7.2+ then you can’t install CodeIgniter 4 via composer.
To install it via composer, you can do it by typing the following command in Terminal / Command Prompt- composer create-project codeigniter4/appstarter project-root
Replace project-root with your project name like – codeigniter4.
If you are getting the message on the Command prompt of not fulfilling the requirements while running. It means intl extension is not been enabled.
Re-run the composer create-project codeigniter4/appstarter project-root.
A new codeigniter4 folder will be created.
Check out our latest blog on Static HTML vs WordPress.

Comments